Lakes of Methane You Say?

As Sun Ra used to say, “Space is the place” and I wholeheartedly agree. Thanks to some adventurous souls who conceived of, built and operated the numerous successful spacecraft which have revealed to us Titan’s, Io’s and Europa’s secrets, we not only have some beautiful images of our celestial neighbors, but have added immensely to our knowledge and understanding of these remarkable and exotic worlds.

Moons_Solar_System_Main_Screen.png

Adaptive Learning Paths
When creating e-learning lessons, you always want to think about your audience and their needs. Often learners have different levels of knowledge and experience. How can you create a lesson that adapts to their different skill levels, so you don’t waste the more-experienced learners’ time going over a bunch of information they already know?

E-learning designers have created adaptive learning paths (or ALPs) to accommodate these different learners’ needs. In this week’s e-learning challenge, David Anderson from Articulate asked us to create an example of an ALP.

Asking Questions First
First you have to assess where the learner’s knowledge level is at. The most common approach is to simply ask them a series of questions, and then based on their answers, only direct them to the parts of the lesson where they need help. In my example, I asked them three questions.

Moons_Solar_System_Titan_Question.png

Confidence Levels
Sometimes learners will answer a question correctly by chance without really knowing the answer. I noticed one of my fellow designers, Jackie Van Nice had added confidence levels into her submission. So I added that feature, but to keep mine simpler, I only gave them two confidence-level options to choose from, either they’re certain they know the answer or they aren’t.

Under the Hood
So how did I make it work? I used a combination of states, variables and triggers.

Each question had three possible answers. Each answer had two states; Normal and Selected. The Selected state had an outline around it so learners would know they had it selected. Also, each of the two confidence levels had Normal and Selected states.

Secondly, I created three variables, each named after the moon being talked about in the questions; Europa, Titan and Io. All three variables were True/False variables with the initial state set to False.

Finally, I created simple check marks on the summary slide that would appear on top of each section of the lesson. All three check marks had two states: Hidden and Normal. If the learner needed to review the section, the check mark would appear (Normal), but if they already knew the material and did NOT need to review the section, the check mark would be Hidden.

Moons_Solar_System_Summary.png

I then added triggers to each of the three check marks. So the Europa check mark for example, would have a trigger set to hide it if the correct answer on the Europa question was selected AND the “I got this” confidence-level was selected. Because in that instance, the learner both got the question right and was sure of their answer, and thus didn’t need to review the Europa section.

Moons_Solar_System_Europa_Selected.png

After I set the triggers for the three check marks, I thought I better add a fourth trigger for those learners who didn’t need to review any of the lesson because they already had it all mastered. In that instance a box would appear telling them so. That box had two states; Normal and an initial Hidden state. I then set a trigger so that the box would only appear (change to Normal) if all three of the variables were set to True.

I’ve done enough talking, check out the lesson here and let me know what you think! I’d also like to thank Jackie Van Nice for sharing with me her transparent Storyline player to create this lesson, that was real time-saver!

Hiding the Quiz Until the End

You have an e-learning course where your client wants the Take Quiz box to appear on the main menu, but doesn’t want learners to be able to take the quiz until after they’ve visited all the sections in the course.

They also want learners to have the option to take the different sections in any order they wish. As learners complete each section, they’ll return to the main menu. After they’ve completed all the sections, the Take Quiz box will become active so they can take the final quiz. Does this sound tricky? Fortunately, I’ve been there and can show you how to make it happen.

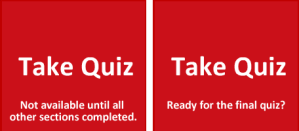
Main Menu with Take Quiz box on right

Main Menu with Take Quiz box on right

1. Create Two Versions of the Take Quiz Box
I needed two versions of the Take Quiz box; one that was clickable and would take learners to the final quiz, and one that was not. I named one “TQ With Link” and the other “TQ No Link”. Learners will see the “TQ No Link” box until they complete all the sections, at which time the “TQ With Link” will appear.

I put the “With Link” version on top of the “No Link” version in the timeline. Both boxes look the same to the learner, with the exception of what they say if the learner rolls over them. Since this requires that the boxes be the same size and in the same position, you can either select them in the timeline, or have one of them off to the side and set its final position after you’re done working on them. Either way, it’s a good idea to name them in the timeline to keep them straight.

2. Add States to the Two Boxes
For the “TQ With Link” box I created four states: an initial state of Hidden, and three other states; Normal, Hover, and Visited. For “TQ No Link” I created two states: Normal and Hover.

3. Add Layers and Triggers to the Two Boxes
So learners would understand why and when the Take Quiz box would be active, I created a layer called “Quiz” that said “Not available until all other sections completed” and added a trigger to make the “Quiz” layer appear when learners rolled over “TQ No Link”.

Then I created another layer called “Quiz 2” that said “Ready for a final quiz?” and added a trigger to make the “Quiz 2” layer appear when learners rolled over “TQ With Link”. And of course, I added a trigger to “TQ With Link” to go to the Quiz when the user clicks on it!

Layers with additional text appear on rollover

Layers with additional text appear on rollover

4. Create Variables and Triggers for All the Other Sections
Next, I needed a way for Storyline to know when each of the sections were completed. To do this, I created a variable and a trigger for each section.

I gave each variable a unique name I’d easily associate with the particular section and had them all start with a value of False. Then I went to the last slide of each section and created a trigger that changes the value of that variable to True when the timeline for that slide starts. That way, Storyline would know when the learner got to the last slide of each section, that meant they had successfully completed that section.

Click X symbol on right to create/edit variables

Click X symbol on right to create/edit variables

Variable created with initial setting of "false"

Variable created with initial setting of “false”

5. Create Trigger on “TQ With Link”
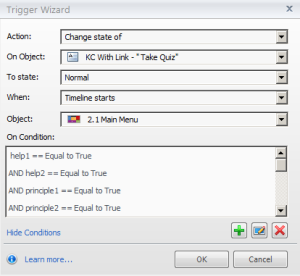
Lastly, on the main menu slide I added a trigger that changed the state of “TQ With Link” to Normal when the timeline for the slide starts AND when all the variables for all the other sections changed to True. Because when all the variables for all the sections are True, we know that all the sections have been completed.

When setting up this trigger, click the + sign to add as many variable changes as you need. ONE CAUTIONARY NOTE: I initially tried to just have the trigger activate when all the variables changed, but learned that that wasn’t enough, you also need to tell it to do it when the timeline for the slide starts.

Select when "timeline starts" on current slide

Select when “timeline starts” on current slide

Click + sign to add variables to trigger

Click + sign to add variables to trigger

To see a stripped-down version of how the menu looks and works, click here.

As always, I know some of this can be a bit challenging. So feel free to contact me if you have any questions about any of these steps.