Getting a Rise out of Epcot’s Flower and Garden Festival

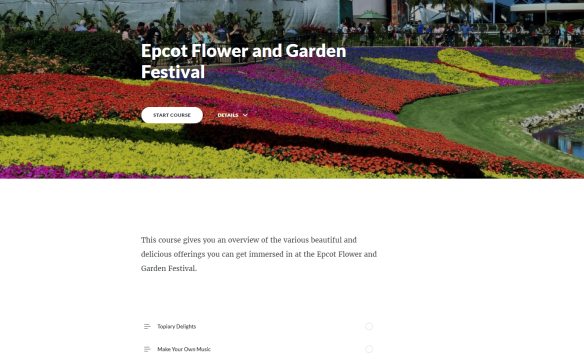
Do you love to graze on a variety of delectable foods from all over the globe? Are you a garden and topiary lover? Do you jump at the chance to play unusual and exotic musical instruments in outdoor environments? If any of these things get a rise out of you, you’re going to love this Articulate Rise course.

EpcotFlowerGardenFrontPageShot

Articulate 360 includes Storyline and Studio which I’ve already worked with for years, but I have never built a course in Rise. So after watching a few instructional videos presented by Tom Kuhlmann, I decided to just dive in and start creating my first Rise course.

Image Options
There are a LOT of ways you can present images in Rise, and being that this course is about one of the most visually-stunning topics, the Flower and Garden Festival at Epcot, I explored a couple of them –  the carousel and the flip card interaction.

Epcot_Carousel.png

Carousel Interaction

One very nice time-saver I learned about from Tom Kuhlmann was how to use PowerPoint to set the aspect ratio / dimensions of the pictures and export them all as PNGs so you end up with nice, consistent images. For the carousel above, I used the standard 16×9 aspect ratio and for the flip card interaction, the 1×1 was a perfect fit.

Epcot_Flipcard.png

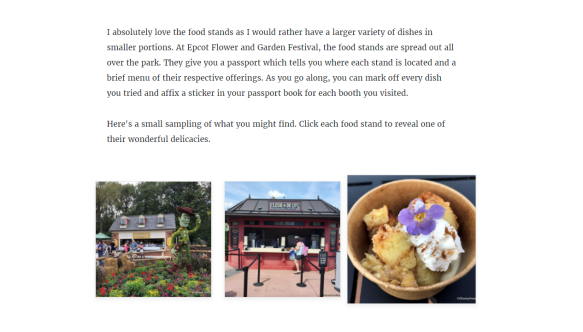
Flipcard Interaction with 3rd Image flipped to reveal Bread Pudding, mmmm!!!

Video Options
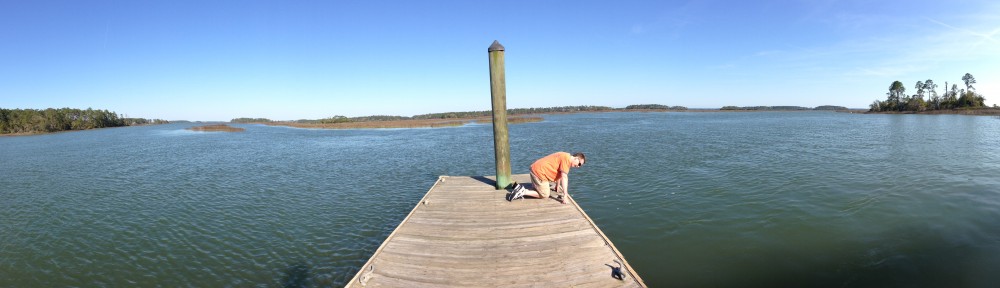
You can also both import and embed videos into Rise. So I grabbed a video shot by e-learning hero Jackie Van Nice of yours truly playing a marimba type instrument in one of the outdoor garden interactions at the festival. Man, was that a blast.

Epcot_video.png

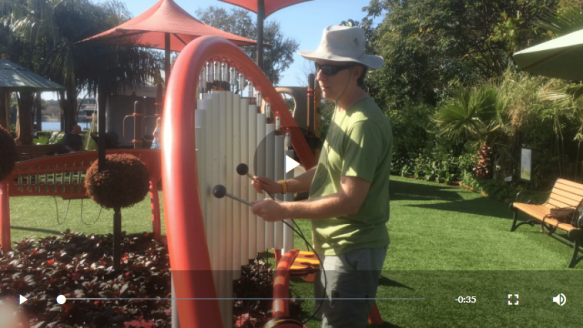
Imported Video of me in my silly cowboy hat playing the ??? (open course to play video)

For the butterfly garden section, I found a wonderful YouTube video describing the exhibit and embedded it into the course.

So I have to admit, there are no new, earth-shattering, thinking-outside-of-the-box ideas here on how to present images and video in Rise, it’s my first course after all, but it really is a fun interactive course which I think you’ll enjoy. Maybe I’ll run into you at the next festival. Check the course out here.


Plussing it in E-Learning

When Walt Disney’s imagineers thought they “nailed it” with a piece of animation or an attraction, he would implore them to “plus it” to give it that extra bit of magic. I like to think one of our roles as e-learning designers should be to do the same.

Click to view Blowing Bubbles Sample

Click to view Blowing Bubbles Sample

But when we start thinking about throwing in lots of bells and whistles the old fears start creeping in. “My client or company won’t want to pay for all that fancy wizardry.” “What will this do to the budget?” “What about project creep?” “Won’t this just be distracting to the learner?”

I think there is a right way and a wrong way to “plus” an e-learning piece. Yes, you don’t want to blow the budget and no, you don’t want to overdo it. Think of “plussing it” like adding an exotic spice or two at the end to enhance a good recipe. You’ve already got the basic graphic and instructional design approach figured out and most of the course is already developed.

Click to view Sample of Plussing Bullets

Click to view Sample of Plussing Bullets

Now you can sprinkle in a few bits of pixie dust here and there to add a bit of wow to the course. You don’t want it on every screen as it can lose it’s impact or simply become overwhelming. I remember seeing a PowerPoint presentation about a software piece called TrainEngine, and the designer replaced every bullet on every slide with the image of a train engine coming in from the side. It was a clever idea, but it was WAY too much.

Finally, keep in mind that your visual/audio enhancements need to support what you’re trying to teach at that moment and not distract from it.  Ultimately, your goal is to teach the learner something specific and make it memorable. In this sample below, notice how I added bits of sound to go with the images and how the bus appears to roll into the picture while staying inside the frame.

Click to view sample

Click to view sample

This Spelling Bee is for the Birds

In this weeks e-learning challenge, we designers were asked to create a spelling bee interaction as the 2014 National Spelling Bee kicks off. I thought that was a great idea as it was something I’d never thought of doing before. I decided to create one based on physics terminology and have it presented by a parrot.

Physics Spelling Bee Intro

Click to play the Physics Spelling Bee

How the hxll did I come up with that?
Well, I had this beautiful image of a parrot flying over a rainforest I had used previously to create an interactive portfolio of my work. I called it “E-Learning that Soars” and I thought maybe I could do something with that. On the other hand, I’m a huge fan of this science program hosted by Morgan Freeman called “Through the Wormhole” where they talk about all sorts of fascinating topics like parallel universes, time travel, etc.

So to combine these two disparate elements of the parrot and physics, I created a story that goes like this: An up-and-coming physicist named Laurie Worthenhiemer has a pet parrot and because Laurie’s always talking about physics at home, Polly (the parrot) has picked up on a lot of the terminology. Polly has a lot of spare time on her hands, so she creates this spelling bee to challenge and entertain her house guests.

Build it and they will come…
Next, I picked four physics terms for players to spell. As is the case in most spelling bees, you’ll hear the term, then you can ask for a definition and hear it used in a sentence. I reached into my “inner-bird” and recorded all the voices using Cubase SX software and a nice Audio Technica microphone. I set up triggers in Articulate Storyline to play the different audio files when the user clicks for the definitions and the sentences.

Definitions and sentence options

Definitions and sentence options

This might sound obvious, but I also made sure that the notes button on Storyline’s player was not checked, as the transcript I was reading from would have revealed the words and thus given away their correct spelling.

The spelling part
I used Storyline’s built-in quiz question with a text entry field for players to type into. I took advantage of the correct and incorrect feedback layers to put in a few witty comments from Polly based on the words the players were attempting to define. I like to customize the colors and feedback on these to fit the situation rather then just going with the generic “correct, you chose the right answer” and “incorrect, you did not choose the right answer” phrases. I also put in a little picture of Polly speaking to the players to personalize it more.

Feedback layer for right answer

Feedback layer for right answer

Keeping score
I used Storyline’s built-in quiz results slide to keep score. Again, I customized it quite a bit eliminating the “you passed” and “you did not pass” layers. Being this was just a game and not really a quiz, I just wanted to give the players a score. I also removed the “percentage right” total and just showed the points.

The final tally

The final tally

If I wanted to, I could have used the built-in pass/fail layers of the quiz results slide to show Polly making a snide comment about a lower score, and another layer with a comment responding to a higher score. Although I didn’t do that here, it’s something you might consider in building your game. So, there you have it, a spelling bee game created in Storyline presented by a parrot all about physics. Enjoy!

Show, Don’t Tell

In the e-learning world, we’re always talking about presenting subject matter to learners in a more exciting, engaging way rather than just telling them about it. But when it comes to explaining to potential clients what we do, we don’t always practice what we preach.

In this week’s e-learning challenge, David Anderson asked us to create an interactive portfolio or resume, so I got to work. I actually already had created a beautiful image of a parrot in flight over a rain forest, and I thought that would be a great image to illustrate creative impulses taking flight.

Click here to view portfolio

Click here to view portfolio

Choosing Colors
I’ve always found the whole business of choosing a palette of colors most challenging. To help with this, I used the eyedropper tool in Storyline, clicking on different parts of the bird and trees in the background picture to get my colors for the menu items and then added a 50% transparency for depth. For the Storyline Player, I used the light blue color of the bird’s feathers.

Ay Kalimba!
I’m a musician, and a couple years back I had recorded a CD of all original kalimba music. Since kalimbas are often made and played in tropical places, I knew a little sample from one of the songs would work just perfectly with the theme.

My Kalimba music CD

My Kalimba music CD

A lot of people are afraid to use more exotic images in their e-learning courses because they’re worried their corporate clients will want a more buttoned-down professional look. But I think those concerns are not only given too much weight, but also can lead to some pretty stuffy, uninspired e-learning modules.

The Lay of the Land
I broke up my work into two columns: one that focused on the type of subject matter (software, ethics, safety, regulatory) and the other on the type of interaction (games, humorous interactions, simulations, branching scenarios).

The Menu

The Menu

When they clicked on one, they could read a little explanation about why and how I did it or they could just skip right to playing the sample itself (the “show” part).

Description and link to view sample

Description and link to view sample

For anyone who wanted to see my resume, what software I used, or my blog, they could find those links on the upper right of the Player. And finally, on the bottom of the menu I had a link to a easy-to-complete contact form if they wanted to talk to me about working on a project.

I hope my experience in creating this different sort of portfolio inspires you to stretch out and get a little more imaginative. I know it’s work, but that doesn’t mean it can’t be any fun.

You can check out anytime you like…

So, you’re taking an e-learning module on ethics for work and you get to the end of the course and… well, you just took the final quiz and it looks like you passed, and… you’re finished right?… but how do you know for sure? It’s kind of like that Eagles tune Hotel California.

It may seem a bit too obvious for most e-learning designers, and maybe that’s why they forget it. But from the learner’s perspective, how do they know when they’ve finished the module? You’ve got to let them know!

In this week’s e-learning challenge, David Anderson asked us to come up with a creative and interesting way to tell the learner they’ve completed the module. Here’s how I did mine.

I decided it should say “Congratulations, you passed with flying colors” the assumption being they had to take a final quiz before exiting the course. That lead me to search out a free-to-use image of a bird in flight that I would animate.

click to see the finished product

click to see the finished product

Breaking up the Image in PowerPoint
I used PowerPoint’s “remove background” tool to remove the bird from the scene it was flying over. Then I right clicked the image and saved it as a picture (PNG file). Then I duplicated the slide three times and used that same “remove background” tool to isolate the two wings and the body and saved them as images as well. 

bird removed from background

bird removed from background

Creating the Animation Cells in PowerPoint
I created a new PowerPoint file, found a suitable picture of a rainforest from overhead to put in the background of all the slides, then imported the PNG images of the two wings and body to put on top of it. Then I duplicated that slide and adjusted the wings slightly on each and saved all those slides as PNG images.

animation cells in PowerPoint

animation cells in PowerPoint

Animating the Image in PowerPoint
Then I create a third PowerPoint file, imported the slide images I just created showing the wings in different positions, and set each picture to animate in “after previous” (instead of the default “on click”). Using the “save as” option, I selected the WMV file extension to save the PowerPoint as a video instead.

Importing into Storyline
I then created a Storyline file, and imported the WMV file. I set the video to start playing automatically. I also added a trigger telling Storyline to play the video again after it stops, so that the video would loop indefinitely. Lastly, I used the eyedropper tool to match the colors of the player and the text bubbles with the bird and the trees in the picture. Click here to see the finished product.

And now, in case you’re wondering, you’re done reading this article. You can go home now.

E-Learning Feud

This week’s e-learning challenge from David Anderson was to present a top 10 list. I decided to present the top 10 things you can do in Articulate Storyline in the context of a Family Feud-type game setting. Besides creating the actual module in Storyline, I used a combination of Macromedia Fireworks and Microsoft PowerPoint to edit the graphics. And I recorded original music for the theme song and all the character voices in Cubase SX.

click here to play e-learning feud game

click here to play e-learning feud game

Graphic Editing in PowerPoint and Fireworks
The game show logo was created using PowerPoint’s Word Art for the chunky font. I actually copied the logo making one version with an orange fill and a second one in yellow, then imported them into Fireworks where all the other shapes and fills were created and layered. I used an existing Family Feud logo as inspiration to create the layered look.

e-learning feud logo

e-learning feud logo

One graphic editing tool I love in PowerPoint is the “remove background”. Oftentimes I need to crop an image, but don’t want to just crop it into a rectangular shape. I had this picture of an audience that I needed to crop around the heads instead of a straight line, and the “remove background” feature allows you to do this easily. Then you can just right click on your cropped version and save it as an image.

Audio Recording and Editing
With very affordable digital editing software, these days all you need is a simple interface to go from a ¼ inch cord into a USB you can plug into your computer, a couple good mics, and you can make professional recordings easily at home. I’d like to thank Jackie Van Nice, an excellent voiceover talent and e-learning designer, for doing all the female voices. I did all the male voices and played all the musical instruments.

Audio editing in Cubase

Audio editing in Cubase

Cubase is a great tool because you can do very precise edits, remove all the surrounding background noise, apply compression, do the most subtle of crossfades, and a add host of other effects to your recording.

Storyline Variables and Triggers
To switch from the slide with the Johnson family to the Smith family, I created True/False variables named after each character with an initial setting of False. Then I created a trigger on the last slide for each character, changing each variable to True once the timeline for the last slide started.

Johnson family slide

Johnson family slide

Basically, you’re telling Storyline when the last slide for a particular character has been visited. Then I created another trigger on the Johnson family slide that tells it to automatically go to the Smith family once all the Johnson family members have been visited.

Then, after all the Smith family members have been visited, I wanted Storyline to go to the final slide for the game. So I did the same thing I did on the Johnson family slide; except I told the Smith family slide to advance to the final slide once all the characters  (for both the Johnson and Smith families) have been visited.

Resources
If you want to get the most out of Storyline, I strongly suggest taking Daniel Brigham’s Advanced Storyline course at Lynda.com for step by step instructions on variables, triggers, and a host of other tools. Also, the forums at Articulate’s E-Learning Heroes site are very helpful.