This week’s e-learning challenge from David Anderson was to present a top 10 list. I decided to present the top 10 things you can do in Articulate Storyline in the context of a Family Feud-type game setting. Besides creating the actual module in Storyline, I used a combination of Macromedia Fireworks and Microsoft PowerPoint to edit the graphics. And I recorded original music for the theme song and all the character voices in Cubase SX.

click here to play e-learning feud game
Graphic Editing in PowerPoint and Fireworks
The game show logo was created using PowerPoint’s Word Art for the chunky font. I actually copied the logo making one version with an orange fill and a second one in yellow, then imported them into Fireworks where all the other shapes and fills were created and layered. I used an existing Family Feud logo as inspiration to create the layered look.

e-learning feud logo
One graphic editing tool I love in PowerPoint is the “remove background”. Oftentimes I need to crop an image, but don’t want to just crop it into a rectangular shape. I had this picture of an audience that I needed to crop around the heads instead of a straight line, and the “remove background” feature allows you to do this easily. Then you can just right click on your cropped version and save it as an image.
Audio Recording and Editing
With very affordable digital editing software, these days all you need is a simple interface to go from a ¼ inch cord into a USB you can plug into your computer, a couple good mics, and you can make professional recordings easily at home. I’d like to thank Jackie Van Nice, an excellent voiceover talent and e-learning designer, for doing all the female voices. I did all the male voices and played all the musical instruments.
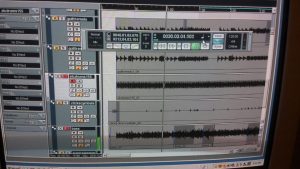
Audio editing in Cubase
Cubase is a great tool because you can do very precise edits, remove all the surrounding background noise, apply compression, do the most subtle of crossfades, and a add host of other effects to your recording.
Storyline Variables and Triggers
To switch from the slide with the Johnson family to the Smith family, I created True/False variables named after each character with an initial setting of False. Then I created a trigger on the last slide for each character, changing each variable to True once the timeline for the last slide started.

Johnson family slide
Basically, you’re telling Storyline when the last slide for a particular character has been visited. Then I created another trigger on the Johnson family slide that tells it to automatically go to the Smith family once all the Johnson family members have been visited.
Then, after all the Smith family members have been visited, I wanted Storyline to go to the final slide for the game. So I did the same thing I did on the Johnson family slide; except I told the Smith family slide to advance to the final slide once all the characters (for both the Johnson and Smith families) have been visited.
Resources
If you want to get the most out of Storyline, I strongly suggest taking Daniel Brigham’s Advanced Storyline course at Lynda.com for step by step instructions on variables, triggers, and a host of other tools. Also, the forums at Articulate’s E-Learning Heroes site are very helpful.